How to Make Hot Pepper Mash

52 Unique Techniques for Stocking Food for Prepper
Buy at Amazon

When I was younger I could not tolerate hot food, but as I age, I find myself enjoying spicy food.

Couple that with my DIY gene, I really enjoy making my own hot sauce; it is not hard and makes a quality sauce for little expense.

This recipe works with any hot pepper, and I usually use a blend of jalapeno and habanero.

Making a pepper mash is different than making hot sauce – you make the sauce from the mash.

The pepper mash is fermented to mellow the flavor of the peppers and really ads to the quality. Tabasco sauce, for instance, is fermented for three years, but I find after 6 months you really don’t get that much more quality.

Since we are letting the peppers ferment, we are going to be adding salt to suppress bad bacteria and mold.

What You Need

The first thing you are going to need is a glass jar or pottery crock, size matters as you only can fill it about ¾ full so it won’t overflow as it ferments. You want a straight sided container so you can use a weighted plate to keep the peppers under the liquid (this prevents mold).

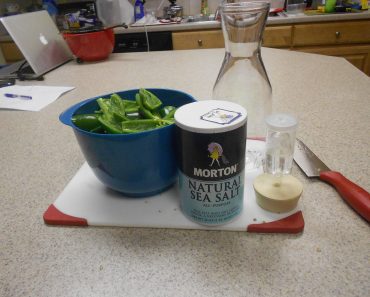
Since I am only making sauce for myself, I actually us a glass juice carafe and a large rubber bung and airlock instead.

As you size your jug, realize that 1 pound of peppers will produce a little less than a pint of pepper mash.

As you pick your peppers, get the largest, plumpest fully ripe peppers from the garden or market. Fully ripe peppers have a more sugar content, so that will help with fermentation.

I remove the seeds from my peppers, but that is a personal choice. Contrary to popular opinion, the seeds don’t add much heat. The real heat comes from the connecting veins that attach the seeds to the pepper walls.

If you are dislike getting burned by peppers, I have a great tip to help wash off the oleo-resin capsicum inside the hot pepper.

How to Make the Pepper Mash

Wash the peppers and dry them with a towel or paper towel before processing them.

Remove and discard the stems.

Add 1 Tablespoon of salt per pint of mash

Process the peppers in a blender.

Pour one Tablespoon sea salt per pound of peppers in a blender and process them on high speed till they become puree (mash), no more than a minute at the absolute most, typically only 15 to 30 seconds

You may add other vegetables, herbs, and spices into the blender and puree it along with the peppers mash, so long as you maintain the salt ratio to weight of vegetable matter. Anything you add will dramatically affect the taste of the finished product, (I add sweet peppers)

Pour the mash into the fermentation jar or crock. You need to keep air away from the mash, but if you seal it airtight it will explode. If you are using a straight sided crock, set an upside down plate inside the crock so that it can move up and down the crock, weigh it down with a ziplock bag full of water. Since I use a large juice carafe, I simply stick in a large rubber bung fitted with a airlock for making wine.

In one week, the pepper mash will start bubbling vigorously as a result of fermentation in which the bacteria will produce acetic acid and any sugars will produce alcohol and carbon dioxide gas. The gas bubbles will cause the pulp in the mash to rise, leaving the liquid and some solids on the bottom.
In another week or two, the fermentation should stop producing bubbles.

You may use the mash as soon as fermentation has finished. I let it age in a dark closet for about 6 months though.

You can use this mash directly on food.  However it’s a simple process to turn it into a sauce.  I will save that for another post….

PRN Episode #37 Semper Gumby

PRN Episode #37 Semper Gumby

PRN Episode #37 Semper Gumby
Buy at Amazon

The Marine Corps motto is Semper Fidelis, or Always Faithful, in my unit we jokingly used the term Semper Gumby – after the rubber cartoon character – meaning Always Flexible.

I must have been a very impressionable young Marine, as I took it to heart and the core of my preparedness plan is to develop a flexible mind that allows me to observe, orientate, decide, and then act in whatever manner best solves the problem and to keep from being bound into a concrete dogma.

In today’s show I speak extemporaneously about why I think preppers can learn from all the other prepper types – the bug out, bug in, into the woods with a knife, homestead, frugal, diy, or cash flush gearheads.  Every type has its strengths, and every type has it’s weaknesses – I make the case that rather than pick a side, we should pick a little of each.

I also discuss the concept of stress inoculation, of balance, and of having to work toward our goals – and that every choice and step we make in one direction limits us in others, so we have be wise preppers.

The show is scheduled for Monday at 10pm central time at this link.

If you cannot listen on Monday, you can always download the podcast for listening at your own leisure.


How to Remove Cosmoline

How to Remove Cosmoline

Removing Cosmoline
Buy at Amazon

There are several ways and opinions about how to remove cosmoline, and many curses heaped on the head of this product over the years.

Cosmoline is not evil, if it was not for its preservative effects, we would not be able to enjoy shooting old military surplus guns as they would not have survived over the years.

You Need to Understand Cosmoline

Before learning how to remove Cosmoline, you first need to understand that it is chemically similar to Vaseline, and is applied by dipping guns into a vat of molten Cosmoline. This means that the preservative is not just gunked up on the gun, but is embedded in every nook and cranny in the gun. If you are going to remove cosmoline from a gun, you will have to disassemble and detail clean it.

Some like to use chemicals to clean out the petroleum based Cosmoline.  I have read accounts of people using gasoline a 55 gallon drums. I think that this is overly dangerous and under-effective. Mineral oil and brake cleaner work just as well.

Hot Water Method

I personally use hot water for the metal, and sun and gently heat for the wood. Some do not like the idea of using water, but in my experience using heat alone runs the risk of cooking out the oil and leaving the dark tar-like crud. Water seems to both heat the oil and help float it away.

The way I do it is to strip off all the wood, and disassemble the gun to is smallest user level parts. I don’t do an armorer level disassemble, but just a detailed field strip. I then put all the small parts in a stainless pot that the wife won’t kill me for ruining (I actually have my own kitchen set by now), and boil them clean.

The Cosmoline will float to the top as it melts. When I take the hot metal out of the water, and quickly clean it with bore solvent, it dries rather quickly and I oil it well so it does not rust.
The longer parts like the barrel, takes more work.

I boil them in a large stock pot, and repeatedly pour hot water down the barrel to loosen up the Cosmoline. A rod will need to be pushed down the barrel as it will be plugged with the Cosmoline.

Attention to Detail Helps

Take special care on the action, as with guns such as the Mosin Nagant, In the video I show a Mosin, but this is not a how to remove cosmoline from Mosin Nagant article.

Cosmoline is notorious for being hard to remove. It may cycle fine, but after a shot or two, the Cosmoline will become tacky and the bolt will be hard to cycle. Additionally, If you fire the gun a lot with the Cosmoline on the action, it will bake on and make a small problem a huge nightmare.

I take care with the stock, and do not introduce boiling water as that will damage the old wood. What I do is to gently heat it up in the sun on a hot day (or VERY gently heat with a hairdryer) and wipe the Cosmoline off with a towel. With repeated heatings and wipe downs you can remove the Cosmoline without damaging the wood. If you go to fast or too aggressive you can strip out the moisture and mess up the stock. I also use murphy’s oil soap to help remove the oily Cosmoline from the wood.

I know this is not an easy process, its messy, and will most likely cause a little bit of marital stress, but look at it as a rite of passage, and a way to help preserve history. Heck, if you get a C&R license, you may even consider buying a curio gun and leave it in its Cosmoline wrapping to allow your kids and grand kids this pleasure.

Mosin Nagant Cleaning Rod Tip

Mosin Nagant Cleaning Rod Tip
Buy at Amazon

At a recent NRA instructor class we got into a Curio and Relic discussion on one of the breaks, and one of the students told me he found a solution to the short cleaning rods that come with the Mosin Nagant 91/30s.

As always, I was open to learning how someone else did things, so I was all ears to hear about his Cleaning Rod Tip

What he did was to take a simple ¼ inch dowel rod and use that to push his patches down the bore.

Since it is wood, it won’t scratch the rifling – it is long enough to push the patch from the breech to the muzzle – and being slightly smaller than .30 it is a nice tight fit.

I like it, and now have a dowel rod near my cleaning bench.  This is a great way to clean guns as the wood will not scratch the bore, it is cheap, and it keeps me from switching jags back and forth.  For some reason I hate unscrewing and changing tips on my cleaning rod.  With the cost of dowel rods and the ease at drilling one out for a jag I can afford to have a few.

Try it, and tell me what you think.

Untitled

How to Keep Your Child Safe With a Car Seat Emergency Sticker

Car Seat Emergency Sticker
Buy at Amazon

I just discovered this idea on pinterest late last week and I hat to share this tip on how you can use this car seat emergency sticker to keep your child safe.

I bumped my schedule around to post this because I think it is exactly what risk management is.  Getting the most safety from the least effort.

If something happens to my wife and I and we would not be able to speak, this Car Seat Emergency Sticker will give responders the information they need.

This allows faster emergency care for W.T.

This was especially useful when he was a baby.  As back then his verbal communication skills were limited to saying “mow mow” when asked what the kitty says…

So what we are going to do is put emergency contact information on a car seat. We are printing out important information to stick on the car seat just in case.

I just made a page that contained vital information that someone might need to know in the event that we ever had a wreck and I was unable to communicate with responders.

I then printed them on regular paper, covered them with clear packing tape and taped one to the side of every car seat we have.

Untitled