How to Make Dehydrated Toothpaste Dots

How to Make Dehydrated Toothpaste Dots


How to Make Dehydrated Toothpaste Dots
Buy at Amazon

Here is a quick tip for backpacking or camping where space and weight is a premium – make Dehydrated Toothpaste Dots.

To make a chewable single use dry toothpaste “mint” lay out foil sheet or parchment and make rows of toothpaste spots.

Allow to dry for 2-4 days.

Sprinkle baking soda on top to keep from sticking.

Repackage in small bags.

I stopped making these Dehydrated Toothpaste Dots when the boy began thinking they were candy.  But they are good for trips and traveling – once you have a can of shaving cream explode, or some shampoo leak into your luggage you begin to think about new ways to pack your stuff.

There really isn’t much more to say about this project other than you should be careful where you let them dry at – you don’t want to leave them in your bathroom because of the bacteria, and you don’t want the to sit out too long because they get really hard and nasty.

If this is not something you want to try, but you still have the issue of packing something light and easy for tooth brushing in the outdoors, you may want to just get a small container of baking soda – but I will warn you – this tastes better.

To use

Pop one Dehydrated Toothpaste Dots in your mouth, chew, then add a small amount of water in your mouth and start brushing.

How to Make DIY Mosquito Repellent Holders

How to Make DIY Mosquito Repellent Holders

How to Make DIY Mosquito Repellent Holders
Buy at Amazon

My boy loves being outside, but kids are especially sensitive to mosquito bites, due to the bees we cannot use traditional pesticides, but I did see this idea on an Alaska bush craft site and decided to try it out while camping.

It worked very well for us last summer, and I finally got around to documenting it.
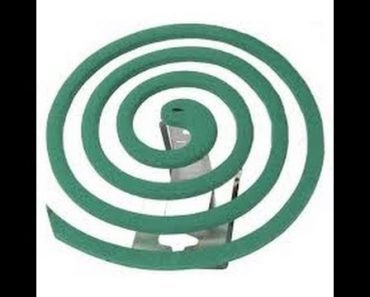
One of the most popular bug repellent to cover large areas such are patios, decks, and yards is the mosquito coil.

These coils use an incense style delivery system where you light one end and it burns as an ember producing smoke containing the repellant. As the air currents spread the smoke around the bugs high tail it out of the area. This is handy when you are working in an area and need wide coverage.

The problem is the small metal coil holders aren’t always appropriate for putting the coils around your work or recreation area. The ones that are able to hang can cost up to $7 to $11 a piece.

Here is a method to make as many as you want for less than a dollar each.

I happen to have some left over rabbit cage wire I used, but if you don’t have scrap, purchase a one foot by three (or four) foot piece of metal screen at your local hardware store.

How to Make Mosquito Repellent Holders

  • Cut the pieces of screen into units that are 5 inches wide and 12 inches long.
  • Fold the piece in half.
  • On either edge adjoining the folded edge, bend the screen over itself, thereby creating a holder with two sides open.
  • Insert a wooden pencil or dowel between the two halves of screen and gently reshape the metal fold to create a bit of a space or gap between the two sides so that it won’t pinch the mosquito coil. (The coil may extinguish itself if the screen is pressed tightly against the coil.)
  • Add a loop of cord or an “S” shaped piece of wire for hanging on whatever objects are handy around the area you want to protect.

Hang several in large areas or where changing air currents require positioning coils in many locations.

DIY Homemade Mouthwash

DIY Homemade Mouthwash Recipe


DIY Homemade Mouthwash
Buy at Amazon

Hygiene is very important in a disaster situation, in a long term catastrophe or in a world without good insurance (Thanks Obamacare) taking care of your teeth will be much harder and much more important.

Products like mouthwash are also pretty expensive so being able to roll your own makes economic sense also.

I like this recipe for homemade mouthwash because few ingredients are needed and the flavor is not horrible.

Also since it uses baking soda, it deodorizes your mouth (just like it does your fridge),instead of masking it with mint.

You should try this DIY homemade mouthwash at least once, or take the time to look at the book “where there is no dentist“.

Oral hygiene is doubly important during a long term disaster where medical resources are not readily available.


Ingredients

  • 1 cup water
  • 1 tb baking soda
  • 5-8 drops peppermint/mint essential oil
  • Some kind of sealable container to keep it in

Procedure

Mix it, gargle it, and tell me what you think

Notes on Homemade Gargle

as you can see the homemade mouthwash ingredients are few, and it is a simple mix.  you can even take it one step further and look at my mint extract video and make your own flavorings if you want to get truly DIY on your homemade mouthwash.  This gargle is not essential for oral health today, but in a large scale collapse or economic downturn it would be handy.

Untitled

How to Keep Your Child Safe With a Car Seat Emergency Sticker

Car Seat Emergency Sticker
Buy at Amazon

I just discovered this idea on pinterest late last week and I hat to share this tip on how you can use this car seat emergency sticker to keep your child safe.

I bumped my schedule around to post this because I think it is exactly what risk management is.  Getting the most safety from the least effort.

If something happens to my wife and I and we would not be able to speak, this Car Seat Emergency Sticker will give responders the information they need.

This allows faster emergency care for W.T.

This was especially useful when he was a baby.  As back then his verbal communication skills were limited to saying “mow mow” when asked what the kitty says…

So what we are going to do is put emergency contact information on a car seat. We are printing out important information to stick on the car seat just in case.

I just made a page that contained vital information that someone might need to know in the event that we ever had a wreck and I was unable to communicate with responders.

I then printed them on regular paper, covered them with clear packing tape and taped one to the side of every car seat we have.

Untitled

Beeswax for Dirty Hands

Beeswax for Dirty Hands
Buy at Amazon

When I garden or work with my hands I tend to end up with dry hands – I have all sorts of beeswax based salves, but preventing is better than treating, at least in my opinion.  So I wanted to show you how to use beeswax for dirty hands to keep them clean.

I have found that if I have some warm beeswax (body temperature) and rub it on my hands I get just enough wax rubbed in to protect my hands, but not so much that I get it caked on (as when I am working with melted wax.)

Because I am using wax and not a salve or cream, the coating is dry and relatively durable, and still comes off with soap and water when I am done working.

I hope this tip on using Beeswax for Dirty Hands helps – if it doesn’t (or your hands are cracked and dry from other things) try my beeswax balm recipe.

This tip does take some work to rub it on, as you have to knead the wax and rub it into between your hands to heat it up.  You can’t just swipe the wax across you palm.  However, from personal experience, this is worth it when you are going to be working in the dirt for a while.