Home Defense Bow - Could It Be the Most Effective Self-Defense Weapon?

Is the Bow an Effective Self-Defense Weapon for Self Defense?

Home Defense Bow - Could It Be the Most Effective Self-Defense Weapon?
Buy at Amazon

This is a guest post, I don’t agree that a bow is anywhere close to being the most effective self defense weapon, but in the spirit that people who don’t/can’t own firearms still need self defense tools I am posting it.  Besides I still get comments on my video discussing why I don’t like the .410 Judge for a self defense gun.

Archery for home defense…hmmm… you think this is the silliest thing you’ve ever heard?

Let me give you a story:

In 1997, a tale was given of how Claude Gates successfully defends his shop against intruders with only a crossbow. He ordered the burglar to stop, but he refused to, prompting Mr. Gates to fire two shots at him. One of the bolts struck him on the side while the other hit his leg. Mr. Gates was hesitant to acquire a firearm in fear of it being used against him in the heat of the battle. The victim and was arrested!

More such incidents of people using the bow and arrow to defend themselves have been documented, making it clear that archery-based weapons are effective at defending yourself from a physical threat (when in the hands of the right person).

When put on a comparison table with a firearm, the most trusted self-defense weapon by man, archery for self-defense shows a number of benefits that I’ll be discussing with you in a few moments…

 Advantages of Home Defense Bow

Portability

One of the things you’ll get to like about using home defense bow is the portability it gives you.

Take for instance the highly efficient takedown bow; it comes in three pieces – middle grip section and two limbs – which you can easily separate by twisting a few lug screws and bam! It becomes extremely portable, unlike most of the home defense options.

You can quickly stash the bag in your bug out bag for easy carry. Plus, it’s incredibly lightweight, adding to its portability.

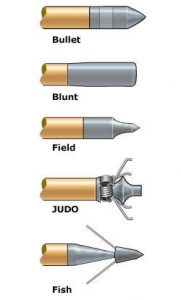
VersatilityTypes of arrowheads
Modern bows have seen tremendous improvements, making them even more suitable for the self-defense task.

Most of the new carbon fiber arrows you’ll get on the market today come with a handy tip that works with a variety of screws in your arrow tips.

This means you’ll have an extensive selection of tips to pick from, from the standard practice tips, small games tips, broad head tips, hook tip, and so much more.

Home Defense Bows Works Silently

When in a self-defense situation, you’d need the convenience of a silent and deadly weapon.

Lucky for you, the bow and arrow makes an ultra-quiet but deadly weapon.

Imagine a scenario where you’re camping in a national forest, and you find yourself under attack in the middle of the night. If you’d just place yourself in a dark corner (where you can easily observe them) with your arrow docked on your bow, the attackers ill have a really hard time telling your exact location.

This will be a huge plus for you, as you’ll have an easy time taking them down, one by one.

Affordability

We’re living in hard economic times. That being said, you’d want to look for an effective self-defense weapon that does not cost you a fortune.

Despite their effectiveness, the bows come with pocket-friendly prices which make them affordable for all, including those on a tight budget.

Besides the bow, the ammunition (arrows) is also cost effective. Once you’ve fully cultivated your archery skills, you’ll find it easy to retrieve all your arrows after making shots and reuse them again and again.

Even better, you can practice making your own bow using readily available materials – like wooden dowels plant shafts, or even the natural found wood.

Legal Limitations

You’ll agree with me when I say the legal restrictions tend to be less strict on bows and arrows than with the guns and bullets.

With this in mind, you’ll enjoy the freedom of using an equally deadly weapon without having to deal with any permits and paperwork.

And the less you have to deal with all this paperwork, the better – particularly when things become messy.

The only (Main) downsides associated with using archery for self-defense:

  • You’ll need to undergo some intense practice to master archery skills for efficient shooting
  • The arrows might become a bit cumbersome to pack sometimes.

Powerful Tips To Get The Most Out of Your Home Defense Bow

Know the capabilities and limitations of your weapon.

For instance, the crossbows – the most popular home defense bows – come with different levels of strength.

The higher the power of your crossbow, the harder it might become to pull the string. A 50lb model will be the easiest to pull back as it comes with the least strength; the 150lb models have superior shooting power but will take time and energy to load.

Practice shooting with your bow regularly.

If you buy your home defense bow and keep in your basement, only to retrieve it when intruders come to your home, it might not offer you much help.

An experienced archer knows the importance of regular practicing with their equipment; it keeps them fully prepared to face any attack that comes their way.

Also, you’d want to consider investing in additional accessories, like a drop away arrow rest.  They give you a better archery experience.

Use the Home Field Advantage

When under attack, always remember to use the familiarity of your home surroundings to your advantage.

No intruder knows your property more than you do. Exploiting this advantage in your strategy will give you an advantage over any intruder!

Always have a backup weapon.

Although it’s relatively rare, your bow might fail when you’re in the midst of an attack. To prevent such unfortunate incidents, I’d advise you to carry a backup weapon, pepper spray.

Having empty hand combat skills will also be a significant advantage. Know how to kick, throw a punch, escape common holds, and the pressure points. If you’ve already to shoot the intruder and it hasn’t weakened them, try exploiting their wound to your advantage in close range combat.

Know the laws of your region.

Despite the lax laws on archery weapons, some states don’t allow folks to use them.

They consider a bow as a deadly weapon, given its ability to kill a person.

Shooting a person who hasn’t been involved in illegal activity with your bow could lead to serious legal consequences.

Get an Alarm System

Do you have an early means of warning?  This could be a home security system or a dog that barks to alert when your home is under attack. This will help you arm yourself in advance as well as secure your family.

Final Thoughts

With your home defense bow, you can easily fight any attackers at your home. As with any other home defense weapon, the effectiveness of your bow will largely depend on the archer (you). With the right strategy execution and preparedness level, you can easily defend your home, business, etc.

The best part about using archery for home defense is that it’s also a hobby that helps relieve stress while increasing your “archery IQ.”

Even if no intruder enters your home in your lifetime, you’ll have enjoyed a fun, inexpensive hobby!

Check out this video:

The Best Archery Tips for Better Result

The Best Archery Tips for Better Result
Buy at Amazon

The state of absolute perfection is achieved by no Archer.

Many steps are involved in a complicated process and too many details to juggle during each shot.

Even archers with perfect coaching and perfect shooting form have to deal with the mental aspects of shooting a bow.

Using these Archery Tips you can be an expert in the most basic fundamentals of shooting form and understand the mental aspects.

Beyond that, the greater part of bow-shooting difficulties emanates from only five elements of the shot sequence.

Take them seriously, and they’ll provide an enhancement in bow-hunting accuracy.

Anchor Twice

A reliable anchor is the foundation of a perfectly executed shot. Anchoring creates the bases of the rear of the sighting system. With no solid anchor point, shots turn out to be unsteady and aiming is more difficult. This brings inconsistencies to your shooting.

The anchor point you choose is based on individual preferences and personal comfort. The anchor point should also be rooted in something static. Cheek, jawbones or teeth are quality anchor bases. They’re fixed and solid. Impressionable anchor bases such as lips, jowls and side burns are poor choices.

To take it one step further, an anchor point shouldn’t involve just one static point… but two static points. This gives you a two-point anchor making sure your shooting hand is placed “just so” for the duration of each and every shot. For instance, I snug my index-finger knuckle tightly into the divot behind my ear, and my thumb wraps around the lowermost point of my jawbone. Choose a method that works best for you.

A kisser button is another trick that performs the same function. It provides an added anchor and make sure your anchor schedule is consistent and repeatable. It assures your bow fits properly. A draw length that is too long can introduce a floating anchor. Get your drawing hand to the middle of your face, and adopt a dual-point anchoring system. Your anchor will become more consistent and your releases will be more controlled.

Watch That Bubble

Most quality bow sights comprise of an incorporated bubble level. Particularly for bow-hunters, levels help get rid of left-right misses, particularly from tree-stands or in broken topography. When shooting peep and sights, any deviations from vertical plumb makes the rest/arrow to swing left or right and send arrows off center. Canting a bow top-limb right—a familiar symptom for right-handed shooters—is instigated by loaded quivers. This causes arrows to miss the mark. The level acts as a reference, assuring each shot is launched consistently.

A fast developing shot opportunity may leave no time for a bubble check. This is why it’s imperative to instill these habits during practice. Check with the level before every shot. After some time, the correct feel will become second nature.

Haven said that, smart bow-hunters at least take a quick look at their bubble levels during challenging shots from tree-stands, in uneven terrain, or for ranges past 40 yards. Severely bending at the waist to address targets below you easily introduces a canted bow.

Fast-falling terrain can create the optical illusion of a level bow, when you’re actually tilting into the bow uphill. The longer the shot, the more deviations are compounded. It’s always worth the extra second to check your bubble. You don’t want to miss—or wound—a season-making animal due to a leaning bow.

Cradle It

A proper bow “grip” goes hand in hand with the bubble-level concept. Avoid the term “grip” in relation to holding the bow at full draw. The bow handle should never be gripped at all. Physically wrapping your hand around the handle to maneuver its attitude results in torque. Torque is the enemy of repeatable accuracy.

There’s a better approach: Put all your fingers together and hold them upright, as if offering your hand for a shake. Create a U with your thumb. Slide the bow handle into the U and allow it to cradle atop your fingers and thumb. You’re not holding the bow at all. Gravity does all the work. Come to full draw and turn your fingers slightly outward. This pushes the heel of your hand into the riser. The draw weight pushes down your solid skeletal structure so muscles remain relaxed. This allows a steadier sight picture and a more solid shooting platform.

There are two vital caveats: Your bow should sit up straight at rest and full draw without any manipulation on your part. This will need auditioning various stabilizers to determine the right feel. I find this is made easier by removing bow quivers and adopting a back quiver like Rancho Safari’s Catquiver line. Use the bow as engineered to be shot.

Take up a wrist sling and adjust it appropriately. The wrist sling eliminates the fear of dropping your bow on release or snatching at it during the shot in a subconscious attempt to avert losing control of it. Many leave their wrist slings loose to slip their hand in when hurried. But without definite support, the purpose of the wrist sling is largely overpowered. Adjust it to support the bow

Surprise Release

Punching the release trigger is a general mistake. An instance: The archer aims while the trigger finger is poised over the trigger, like a coiled snake. He then yanks the trigger when the proper pin sweeps into the bullseye. This leads to even bigger problems, such as shot nervousness and target panic.

If using an index-finger release, cut down the extension shank so the jaws hit the first joint of an open palm. At full draw, the trigger should hit the middle joint, instead of the sensitive tip. While triggering, use all fingers as a single unit.

This puts you in more control and allows you to squeeze more efficiently. Aim and allow your sight pin to float over the bullseye. Deliberately create a figure-8 if required. Continue to aim. Focus on allowing the pin to float and slowly increase trigger pressure until the arrow releases.

If trigger-punching habits are bad, ditch the index finger release and use a thumb-activated T-handle release. The shot sequence is the same. It allows the pin to float on the bullseye while aiming. But this time, cautiously wrap your thumb around the trigger barrel and pull into the draw to release the arrow.

You’re not physically squeezing the shot, but gradually pulling your shoulder blades together to amplify the pressure on the limbs against the cam’s draw stops. The draw pressure pulls the trigger barrel into your fixed thumb. This is a true, back-tension surprise release. This technique reduces anxiety and allows you to focus on aiming, and it will make you get a better shot.

Follow Through

The propensity is to jerk the bow down, watching arrows sail away, or basically allowing shooting form to fall apart once the release trigger is pulled. The problem is your timing can physically pull the shot off the mark. When shooting suffers, you usually get back on track by reminding yourself to concentrate on the follow-through. I keep on aiming until the arrow sinks into the target.

Follow-through involves strong concentration. It concentrates on keeping everything still once the shot cuts. It attempts to hold the pin on the bullseye until impact. Lastly, it requires mentally willing your arrow to go where you want it.

Pay Attention to the Tension on Your Draw Hand

This is one of the common problems we see in archers both with and without experience. Putting avoidable tension on your draw hand can lead to arthritis problems in the future. Even veteran archers can practice at length with archery bag targets and overlook this feeling during the rush of a good session.

To have a good release of your arrow, it’s very important that you relax your draw hand before the bow fires to break up the force created by the firing of the arrow. If your draw or even bow hand is tense, that tension will pushback against the force produced by the arrow which can cause the arrow to potentially jerk or rotate during the release.

In view of the fact that that can affect where the arrow will land, you want to stay away from that tension. Rather, you want to practice a clean and steady shot that you can repeat and that comes from a relaxed posture. If you aren’t sure how to start doing this, try concentrating exclusively on your thumb and forefinger. Usually, many people aim best near the start of their cycle than the end, so try not to focus on hitting the perfect shot when practicing this method.

As an alternative, focus on the movement of your elbow at the start of the draw and then the feeling in your thumb and forefinger during the aiming process. It’s recommended that you release your shot in about 5 seconds or less, or else you may find it difficult to continue to maintain the bow draw while also concentrating on relaxing your fingers.

Never Copy another Archer over Success – Find Out What Works For You

One more common issue occurs when archers spend a lot of time practicing together on the same range or see each other regularly in competition. One archer who is doing well time after time will see another individual struggling a little and offer some helpful advice. Or, the struggling archer – becoming more and more frustrated with their performance – will see a trick or particular bow accessory working well for another archer and feel like it’s compulsory for them.

While at times this can be very helpful, you should be careful with entirely changing your style or habits based on a short time frame of frustration or trouble. Everyone goes through ebbs and flows in their performance, and everyone’s background in archery and practice schedules are diverse. It’s worth exploring changes you can make to your routine or bow to improve your own performance – but make sure that process starts by figuring your own weaknesses and building on that – not just copying another archer seeing success.

This matters the most when discussing your stance and firing habits such as the length of time spent aiming. Every archer has a different physique and thus the force from the bow is handled differently by everyone. One archer may favor pushing the shoulder forward during setup, while another may be more contented just holding the shoulder naturally.

While of course there are unsafe practices and other forms that are discouraged, there are also many correct answers to problems around stance. All of the archers you train with may be comfortable with a completely closed stance, but that doesn’t mean it has to be mandatory for you. Try it for yourself at your local range and see what works for you.

Basic Tips for Firearms Deer Season

Basic Tips for Firearms Deer Season
Buy at Amazon

With Deer season in full swing, the forested areas are loaded with anxious hunters, observing and waiting for the ideal chance to take a shot at deer.

In case you’re one of the fortunate hunters who have a license for the deer hunting season, getting readied now—by gaining knowledge and gathering materials —is the perfect way to a successful and safe hunting experience.

While hunting down a deer is usually the memorable part of any deer chase, make sure you exploit every one of the encounters that deer hunting has to offer. Hunting has been a zeal for the men as usual. We as humans possess this natural sense inserted in us. So, even now, if given an opportunity, we don’t miss the chance of going out on a hunting trip.

However, did you know you should be all ready for it? Taking a shot even at squirrel needs a great deal of readiness on your side. Buying the best hunting boots should be one of your targets in making preparations for your hunting trip. As a hunter to be, you will need some basic tips to broaden your knowledge on deer hunting and to make your hunting trip a successful experience.

5 Tips for Firearms Deer Season for New Hunters

deer-season-2Purchase Ammunition Now

For quite a while now, ammunition has been rare. Numerous common hunting cartridges might be hard to acquire. You need to visit your favorite firearm store that offers ammunition for sale before your deer hunt in order to be certain that you can buy the best possible ammo. In addition, make sure you match the best possible ammo to the rifle.

If the firearm store has the ammo your deer rifle needs, purchase enough for this hunting season. The ammunition will be needed for practice and for the deer hunt. If your favorite firearm store doesn’t have what you require, go online and buy your ammunition from a seller on the Internet.

Identify Hunting Property

Most new deer hunters have two alternatives: Public land and Private land. As a deer hunter to be, if you have entry to your own property you are one exceptionally fortunate hunter. Enjoy it. Few deer hunters feel that on hunting on public land is an awful decision. Don’t believe them. Public land is available for use when so assigned. There are a huge number of acres of land available, and the deer wander about over private and public terrains.

Whichever sort of parcel you like to hunt, get current topographic maps. The best hotspot for studying topography is the web, utilizing Bing Maps or Google Maps. Their previews from satellites might be a year old or so, yet they give the best superior perspective of the topography, including the area of any homes or sheds.

Learn the Regulations

These laws and regulations depend solely on each state. There might also be local laws that decide rules for allowing or disallowing hunting. Get the most current information on the state’s site.

Understand that the hunting laws and regulations that the state circulates are just a summary of the real laws and regulations. In order to be certain of what you may lawfully do in the quest for amusement, read the statutes carefully.

deer-season-3Purchase Your Hunting License and Tags

The sales of hunting license bolster wildlife conservation in U.S. Every hunter has knowledge the benefit of acquiring the hunting tags and license for their hunting trip. These purchases, alongside dollars for weapons and ammunition, not just give the hunter legitimate status to hunt the game, but also give dollars from the Pittman-Robertson extract charge that was set up in 1937 to guarantee that the North American Hunting Customs proceeds for future eras.

Plan Your Hunts

Begin now to open up the cases and packs of your new deer-hunting equipment or the equipment that you are obtaining. Shake everything out. Hang dress outside for a natural air treatment. You might need to drag your external apparel in the leaves where you have in mind to hunt for it to retain local scents, then hang it up and bag it in a smell- free box.

On the other hand, if you like, utilize the smell- free attire. Look at your supply of all the instruments you utilize, including binoculars, compass, GPS, socks, boot, gloves, caps, rucksack, medical aid kits, game calls and fragrances, bottle or canteen, warm, frosty and wet climate clothing. Ensure that all batteries are new.

Conclusion

Memorize these basic tips and ensure that everybody who hunts with you take note these important tips as well. Also, put on hunter orange dress as required by law. You would prefer not to be mixed up for the deer by another deer hunter. Following these essential tips will guarantee that you have a safe deer hunting season. Happy Hunting!

Survival Items No Hunter Should Be Without

Survival Items No Hunter Should Be Without
Buy at Amazon

I ended up on writing this post on Survival Items No Hunter Should Be Without especially for the novice hunters or for those who take hunting as a very safe and secure task.

If you think that you will go and get the animal and will be back within hours, it’s not really that simple.

Like everything else, there’s a dark side of hunting. You can go astray, get injured or may face any misadventure.

So, the best you can do, before wandering off the beaten path, is to be well-prepared and well equipped, to face any undesirable incident. And for that, you must have some essential survival items no hunter should be without.

Must-have Life-Saving Survival Items!

Talking of survival gear, the list could be as long as you wish. But being a backpack hunter or adventurer, you have to make sure that you pack an easy-to-carry weight on your back. So, the items, I have enlisted here, sit right on the measure of safety and comfort.

Whistle

Buy at Amazon

A whistle on the hunting field is not just a tool, it’s your source of connection with the outer world. In case, you go astray or get stuck somewhere in the middle of the forest, a whistle plays the role of a signaling tool.

Blowing of the whistle by the stranded hunter may signify his presence to the other hunters (or any other fellow) around. And he may get help on time.

Note: For a better result, buy safety whistles that produce louder sounds and not the common toy whistles of your kids.

Flashlight

Buy at Amazon

At least I can’t imagine a hunting trip without a LED flashlight.

A LED flashlight is preferred because it promises a better battery timing (with aa batteries) and that is the most important thing while you are staying disoriented in the dark surroundings.

A small and handy LED flashlight, that easily fits in your hand or pocket, is highly recommended.

Compass/GPS

Buy at Amazon

Calling a compass, a great life-saver would not be wrong. But there is no use of carrying one if you don’t know how to use it. With a little bit of guidance, you can learn its functioning.

It’s the best thing that literally saves you from getting lost. If not a compass, a GPS unit or even mobile GPS can work for you.

There are many great GPS apps on the cell phone that feature a detailed mapping information of the required area.


Waterproof Map

Buy at Amazon

In such areas of wilderness, it would be quite risky to go without a map. Make sure you have a waterproof map of the area; you are going to hunt as the weather in such areas is extremely unpredictable. You never know when it starts to rain or snow.

A Swiss Army Knife

Buy at Amazon

If you have it, you have everything. For such hunting expeditions, a Swiss Army Knife is a must-have.

At least I can’t travel without one.


A Fire Starter

Buy at Amazon

To survive in the cold, dark areas, the fire has a good role to play. Don’t forget to have a fire maker.

It could be anything, from a handy fire starter, lighter (that easily fits in your pocket) to waterproof matches.

First Aid Kit

Buy at Amazon

It’s one of the most basic items. Not just for hunting but for all kind of adventures.

Pick the best one with all the updated items like; bandages, sunblock, pain reliever and disinfectant wipes.


Food

Buy at Amazon

Don’t forget to pack some easy-to-prepare food items with you. It may include some energy bars, tea bags and instant soup etc.

Water Purification Tablets

Buy at Amazon

Finding clean and clear water in such locations might be hard. Water purification tablets are the handiest way to get drinkable water each time.


Space Blanket

Buy at Amazon

You must be thinking how a blanket can be managed. I am talking about space blanket that is considered best for such trips. These are windproof, waterproof and so lightweight that you can easily fold, pack and carry them.

Cell Phone

Another must-have item for those who really want to make it out safely is your cell phone. The cell phone should be fully charged. Second to a cell phone can be a two-way radio. Both of these items should be kept in a waterproof container.

Appropriate Clothing

Your clothing and outerwear, both should be carefully picked. If it is winter, dressing up in layers is what I always do and suggest to others.

Headlamp

If you have a flashlight, that’s great but carrying a headlamp has its own benefits.

It always keeps your hand free from carrying the torch. And you can walk in a more relaxed manner.

A Metal Cup

Buy at Amazon

A stainless-steel cup is a multi-purpose item. From boiling or drinking water to even cooking a meal, this small, handy cup can be a great companion.

A Thin Plastic Sheet

Lastly, you must have a thin and easily foldable plastic sheet. This could be useful in various situations. You can not only lie down on it but also can use it as a cover in spine-chilling cold or rain while hunting. So, pick the size of just about your length.

Best Hunting Backpacks for your Hunting Trip

Carrying all these above-mentioned items is not possible without a high-quality and durable backpack. For buying a backpack, you can’t compromise on quality. Here is some basic info that you all should know.

    * Before buying your hunting companion, make sure that the fabric is waterproof, durable and lightweight.
    * For big game hunters, a framed backpack (both internal and external) is highly recommended. In framed one, the weight is transmitted on your backside.
    * Looking for just a daypack for small game hunting, you can buy the frameless ones. In frameless backpacks, the weight remains on your shoulders.

Conclusion:

My last words are just for your safety. Whether you are a seasoned or a novice hunter, your safety comes first. Make sure you have got all these gears in your most suitable backpack before you set out to the final hunt.

How to Make Arrow Fletching With Duct Tape

How to Make Arrow Fletching With Duct Tape


Duct Tape Arrow Fletching
Buy at Amazon

Several years ago I tried out Dave Canterbury’s sling bow. It was fun and I saw that it had potential,  Unfortunately, arrows are expensive.  The short arrows I bought just did not develop enough energy to be useful.

I decided to look into making my own arrows.  Arrow-making has obviously been around a long time.  So it is a pretty developed science.  Feathers arraigned in a 3 feather system are the most common.  However, some use 2 or 4 feathered fletching systems.  Additionally plastic vanes are available commercially.

In today’s article we are going to go “mad max” and create Duct Tape Arrow Fletching.

The Prepper MacGyver’s Most Common Resource is Duct Tape.

The great thing about duct tape is that is common, cheap, is not too stiff so that it can bend as it comes in contact with the bow, but when doubled up is stiff enough to direct the arrow in flight.

To make fletching simply cut three bits of tape about six inches long.

Pick up one piece and bend it lengthwise to form a “U” with the sticky side outwards. The base of this “U” is stuck lengthwise along the shaft – in other words (and the video will help) the middle of the tape is stuck to  1/3 of the diameter of the shaft with the two ends flopping free.

Now pick up the second piece and bend it like the first one. This one will be stuck in position a third of the way around the shaft from the first one, while the first bit of tape is still bent in the “U” position to keep it out of the way. You do not want the two pieces of tape to stick together until you get everything situated. (I find that clipping the loose ends of the first piece of tape together keeps them out of the way.

Once you feel that the two pieces of tape are sitting in the right position, you can allow the two adjacent wings of tape to stick to each other, forming the first complete vane.

Mold the tape against the shaft to get it to stick well. The two bits of tape will sometimes stick without being exactly in the right position thus skewing the vane or making it lumpy.

Apply the third piece of tape is applied in a similar manner.

Tips for Duct Tape Fletching

A challenge with this tape fletching is to get three flat and evenly spaced vanes.

Another problem is to end up with the vanes where you want them in relation to your nock so that you get the conventional “cock and hen feather” configuration with the cock feather at right angles to the plane of the nock.

Once you have the tape into place, you can trim the vanes with sharp scissors.

Keep the vanes tapering down to nothing at the leading end so that they ride nicely past the bow and your bow hand.

Keep the vanes as narrow as possible and make the taper as long as possible.

You can also apply a tight wrap of soft insulation tape over the very front end of these plastic vanes to stop them catching and pulling away.

Obviously this won’t give you a good a result as using proper fletching and a jig like the one below, but it is serviceable and just the thing to use if your using a homemade PVC bow (more on that later).