How to Extract Clean, Drinkable Water From Plant Leaves

How to Extract Clean, Drinkable Water From Plant Leaves


Survival with Water Condensed from Leaves
Buy at Amazon

As a child I used to read about solar stills made by digging a hole in the desert and covering it with clear plastic, I was an adult by the time I actually visited a desert environment, but I was very disappointed with the results.

However, by placing a plastic bag over the leaves of a living plant, you can extract clean, drinkable water from plant leaves. This survival tip is very easy to do.

I was able to collect much more water condensed from leaves than I could from the typical solar still dug into the ground.  Additionally, this method too far less work and effort.

Condense Drinkable Water From Plant Leaves

Material:

  • Several Large clear plastic bags
  • String or cord
  • Live, non-poisonous vegetation with green deciduous leaves

Procedure:

  1. Tie a clear plastic bag on the end of a plant or small tree branch. The bag should be sealed very tightly over the branch so water cannot escape.
  2. Water vapor will collect and condense in the bag.
  3. Wait until evening for maximum condensation before removing the bag.
  4. Switch the bag to another branch and repeat.

Yield:
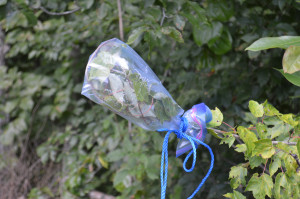
 Water Condensed from LeavesYou can expect an average of one cup of water per bag per day – which means you will need 16 of these devices per person to collect the minimum recommended one gallon per person per day or water.

Gathering water condensed from leaves is much easier than other condensation methods, but as with any method it takes a lot of stills to get enough water.

How to Make a Homemade Cable Snare


Building a Homemade Cable Snare
Buy at Amazon

My friend William Smith, who used to trap in Alaska and now builds very inexpensive, but quality snares.  He agreed to show me how he builds homemade cable snares.

The Parts are Pretty simple

  • 3/32 aircraft cable
  • Sure-lock snare lock
  • Double ferrule
  • Single ferrule.

To Build a Homemade Cable Snare:

  • First, you run the cable through the sure-lock device, make a loop, and then run it back through
  • Next, lock it in place with a single ferrule on the loop end.
  • Then, run the long end of the cable through the double ferrule, loop it around, and put the free end back into the ferrule to make a loop for a swivel or to attach to the tree.

As you can see it is pretty easy to make a homemade cable snare.  When Smitty gets his shed wired so we don’t have to yell over the generator I want to show how to make a snare lock using a penny.

I plan on buying some of his snares, but before I do that, I have to get him to show me how to wax and dye them so I can actually catch some meat with them.

Using a Pencil Sharpener for Tinder

Using a Pencil Sharpener for Tinder
Buy at Amazon

As far as survival gear goes, I like cheap, light, unobtrusive, and multi-use. Today’s tip of using a Pencil Sharpener for Tinder fits all those things.

If you keep a small pencil sharpener in your gear you can use it to make tinder for your fire. It the outside of the wood is wet from a quick rainstorm, by cutting into the wood you can access dry material.

As a side benefit – the pencil sharpener will put a point on small diameter wood which you could use to make traps, fishing implements, tent stakes – whatever – and in a pinch the razor can be removed and uses as a small knife.

Not bad for something you can buy at the dollar store…

The best thing about using a pencil sharpener for tinder is that it weighs practically nothing, is small and ob obtrusive, and if you take care when selecting it, you may be able to disassemble it to get a razor you could use if needed.

This is a great survival kit idea, it it light, cheap, small, and never goes bad.  I make a point to keep a pencil sharpener in all my tool bags just for those reasons.

Knots: Figure Eight

Knots: Figure Eight
Buy at Amazon

If you are involved in either sailing or rock climbing, it is likely you know the importance of the Figure Eight knot. It is used to stop ropes from running out of retaining devices.

Like the overhand knot, it will jam under strain, but unlike the Overhand, which often causes the rope to have to be cut, the figure of eight is usually more easily undone than the overhand knot.


Tying the Figure 8

  • Pass the tail over itself to form a loop.
  • Continue under and around the standing end.
  • Complete the knot by passing the tail down through the loop

Can also double the rope up and make a figure 8 on a bite to be used for anchoring rope.

When my dad taught me about mountaineering and repelling this was one of the first knots he had me memorize.

He told me that proper knots are more than just pretty.  They were a sign of professionalism and knowledge.  He said that proper knots did the job they were designed to do, and as a rule (with the double fisherman as an exception) were easier to untie than improper knots.

To this day, I cannot tie a load down without thinking of him.

How to Tie a Clove Hitch

How to Tie a Clove Hitch

Knots: Clove Hitch
Buy at Amazon

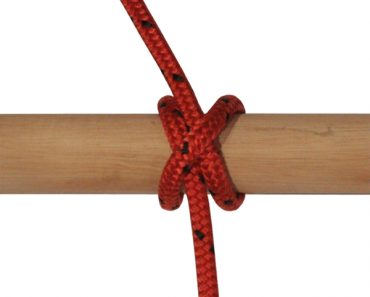
There are a couple knots that everyone needs to know.  The  Clove Hitch is one such knot.

A clove hitch is used to tie a rope to a cylindrical object (like a fence post or tree).  However, it is unreliable when tied on a square post.

What makes it useful is that if you feed the rope in from either end the knot will loosen.  This makes it adjustable.

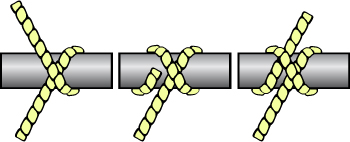
Basically it is just two half-hitches tied in a row

This knot is used a lot in lashing.  I have actually thought about doing some how to lash articles.  However, besides doing a tripod lashing article, I just haven’t gotten around to it in the manner I desire.

With this in mind, as the boy gets older I can video teaching him how to do it.  That would work, as many of these videos are really for him anyway.


Tying a Clove Hitch

  • To tie a clove hitch at the end of a rope, pass the end around the pole starting at the right, with the end coming around below.
  • Next, put the end around in the same direction to cross over the standing end to be above the first loop.
  • Then, as the end comes around, put it under itself to be over the standing end.
  • Check that both ends are in the middle, emerging in opposite directions.
  • Finally, pull to tighten.

When pulled tighter, the rope passing over itself binds it in place.